idea设置

注释中文乱码

已设置全局编码格式UTF-8,项目编码格式UTF-8,中文不能正常显示
如config.properties,里面中文注释显示为utf8字符编码数字
解决方法:file->settings->editor->file encodings
勾选(Transparent native-to-ascii converstion)

阅读全文
appium之webdriver与webview

appium之webdriver与webview

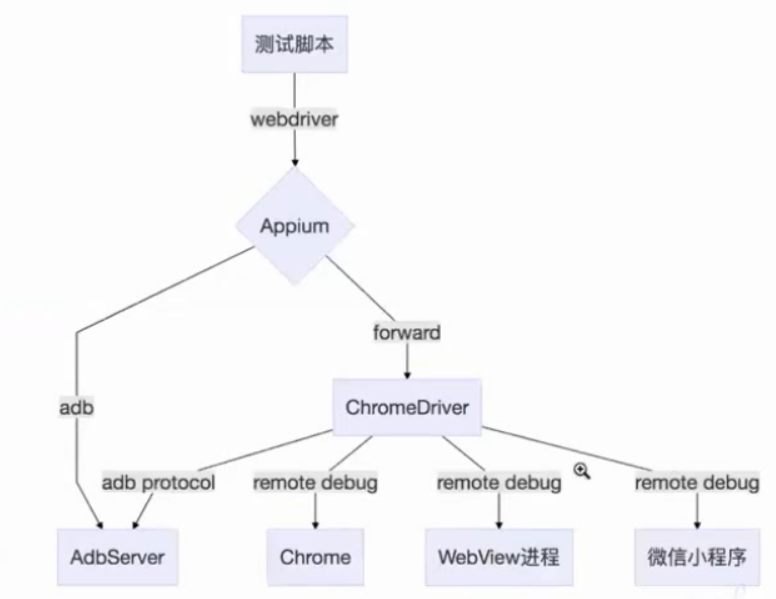
结构图

image-20200920143124146

webdriver协议与⼿⼯模拟

1
2
3
4
5
6
7
8
# session_id获取
session_id=`curl http://127.0.0.1:4723/wd/hub/sessions | awk -F\" '{print $8}' `
# element id获取
curl -X POST http://127.0.0.1:4723/wd/hub/session/$session_id/elements --data-binary'{"using":"xpath","value":"//*[@class=\"android.widget.Toast\"]"}' -H "Content-Type:application/json;charset=UTF-8"
# 元素属性获取
curl http://127.0.0.1:4723/wd/hub/session/$session_id/element/$element_id/attribute/text
# 元素动作
curl -X POST http://127.0.0.1:4723/wd/hub/session/$session_id/element/$element_id/click

webview

https://github.com/appium/appium/blob/master/docs/en/writing-running-appium/web/chromedriver.md

1
2
3
4
5
6
7
8
9
10
getContextHandles
查看所有的webview进程
adb shell cat /proc/net/unix | grep webview
context切换
把domain socket映射为本地的socket端口
adb forward tcp:$port localabstract:webview_devtools_remote_$pid
获取对应的webview组件版本http://localhost:$port/json/version
chromedriver协议交互
微信小程序调试开关
debugx5.qq.com

等待

1
2
3
4
5
# 全局隐式等待,默认值是0,也就是不等待
driver.manage().timeouts().implicitlyWait(10, TimeUnit.SECONDS);
# 显式等待
WebDriverWait wait = new WebDriverWait(driver, 10);
WebElement element = wait.until(ExpectedConditions.elementToBeClickable(By.id("someid")));

调试分析

1
2
3
Appium Log 清晰记录了所有的请求和结果
getPageSource 界⾯的完整dom结构. xml⽂件
driver.findElementsByXPath(“//*") #利⽤xpath获取所有匹配的元素(脚本内调试)

questions

chrome的inspect弹出空白

1.手机数据线连接电脑,开启手机上的USB调试功能

2.微信访问debugx5.qq.com,点击信息打开TBS内核inspector调试和X5jscore inspector调试

3.打开Chrome浏览器,在地址栏输入:chrome://inspect/#devices访问

4.开始页面会一直空白

原因:国内无法访问 https://chrome-devtools-frontend.appspot.com,chrometophone.appspot.com

解决:代理

阅读全文
influxdb&Grafana搭建可视化监控平台

influxdb部署

1
2
3
4
5
6
7
8
9
10
11
12
13
14
15
16
17
18
19
20
21
22
23
24
25
26
27
28
29
30
31
32
33
34
35
36
37
38
39
#拉取influxdb镜像
docker pull influxdb:1.8.1
#启动influxdb
docker run -d -p 8086:8086 --name influxdb influxdb:1.8.1
#进入容器
docker exec -it influxdb bash
#查看相关工具
cd /usr/bin
find | grep influx
./influx
./influx_inspect
./influx_stress
./influx_tsm
./influxd
#查看Influxdb版本
./influx -version
#查看数据库
/usr/bin# ./influx
Connected to http://localhost:8086 version 1.6.1
InfluxDB shell version: 1.6.1
> show databases
name: databases
name
----
_internal
> exit
#创建数据库
> create database testdb
> show databases
name: databases
name
----
_internal
testdb
#删除数据库
drop database [db_name]
#使用数据库
> use testdb
Using database testdb

grafana部署

1
2
3
4
5
#拉取grafana镜像
docker pull grafana/grafana:7.1.5
#启动grafana
docker run -d -p 3000:3000 --name grafana grafana/grafana:7.1.5
(用户名密码默认为:admin)

ifluxdb的数据上传

https://docs.influxdata.com/influxdb/v1.7/tools/shell/#import-data-from-a-file-with-import

将单个点写入mydb数据库。数据包括测量值cpu_load_short,具有标签值server01和us-west的标签键host和region,具有字段值0.64的字段键值以及时间戳1434055562000000000

1
curl -i -XPOST 'http://localhost:8086/write?db=mydb' --data-binary 'cpu_load_short,host=server01,region=us-west value=0.64 1434055562000000000'
阅读全文
Battery Historian--Android耗电分析

Battery Historian服务部署

1
2
3
4
docker search battery  
docker run --name=battery -d -p 9999:9999 bhaavan/battery-historian
# 如有代理
docker run -p port_number:9999 gcr.io/android-battery-historian/stable:3.0 --port 9999

浏览器打开:http://host:9999/

耗电统计是系统组件,伴随系统运行的整个过程,也就是说系统运行他就一直在统计。这个统计是基于软件层面实现的,不同的硬件模块配置了不同的参数,然后使用算法进行估算,power_profile文件的参数值OEM厂商必须测量并提供前实际值,所以不同的厂商是不一样的。另外获取统计报告的时候需要将统计重置,并断开usb连接(连接时充电影响统计有效性)

设备耗电报告获取分析

1
2
3
4
5
6
7
8
# 默认情况下,统计信息是在运行基础上维护的,Android也不记录特定于应用程序的用户空间wakelock转换的时间戳。如果您希望Historian在时间线上显示关于每个单独唤醒锁的详细信息,则应在开始实验之前使用以下命令启用完整唤醒锁报告(启用完全唤醒锁定报告,电池历史记录将在几个小时内溢出。使用此选项进行短时间测试(3-4小时))
adb shell dumpsys batterystats --enable full-wake-history
# 采集报告前将battery统计状态重置,重置命令结束后断开usb,操作app进行相应活动,测试结束后用获取报告命令导出统计文件包
adb shell dumpsys batterystats --reset
# 安卓7.0及以上
adb bugreport > bugreport.zip
# 安卓6.0及以下
adb bugreport > bugreport.txt

报告上传上述服务,可查看分析结果

阅读全文
Yapi

构建

源码地址:https://github.com/YMFE/yapi

使用:https://www.freesion.com/article/7738391556/

1
2
3
4
5
6
7
8
9
10
11
12
13
14
15
16
17
18
19
20
21
22
23
24
25
26
27
28
29
30
31
32
33
34
35
36
37
38
39
40
41
42
43
44
45
46
47
48
49
50
51
52
53
54
55
56
57
58
59
60
61
62
63
#使用 Docker 构建 Yapi
#1、启动 MongoDB
docker run -d --name mongo-yapi mongo
#2、获取 Yapi 镜像,版本信息可在 阿里云镜像仓库 查看
docker pull registry.cn-hangzhou.aliyuncs.com/anoy/yapi
#3、初始化 Yapi 数据库索引及管理员账号
docker run -it --rm \
--link mongo-yapi:mongo \
--entrypoint npm \
--workdir /api/vendors \
registry.cn-hangzhou.aliyuncs.com/anoy/yapi \
run install-server
#自定义配置文件挂载到目录 /api/config.json
#官方自定义配置文件 https://github.com/YMFE/yapi/blob/master/config_example.json

#4、启动 Yapi 服务
docker run -d \
--name yapi \
--link mongo-yapi:mongo \
--workdir /api/vendors \
-p 8880:3000 \
registry.cn-hangzhou.aliyuncs.com/anoy/yapi \
server/app.js

#访问 http://localhost:8880 登录账号 admin@admin.com,密码 ymfe.org
#关闭 Yapi
docker stop yapi
#启动 Yapi
docker start yapi
#升级 Yapi
#1、停止并删除旧版容器
docker rm -f yapi
#2、获取最新镜像
docker pull registry.cn-hangzhou.aliyuncs.com/anoy/yapi
#3、启动新容器
docker run -d \
--name yapi \
--link mongo-yapi:mongo \
--workdir /api/vendors \
-p 8880:3000 \
registry.cn-hangzhou.aliyuncs.com/anoy/yapi \
server/app.js
#手动构建 yapi 镜像
#1、下载 YAPI 到本地
wget -o yapi.tar.gz https://github.com/YMFE/yapi/archive/v1.8.0.tar.gz
下载地址:https://github.com/YMFE/yapi/releases
#2、编辑 Dockerfile
FROM node:12-alpine as builder
RUN apk add --no-cache git python make openssl tar gcc
COPY yapi.tar.gz /home
RUN cd /home && tar zxvf yapi.tar.gz && mkdir /api && mv /home/yapi-1.8.0 /api/vendors
RUN cd /api/vendors && \
npm install --production --registry https://registry.npm.taobao.org
FROM node:12-alpine
MAINTAINER 545544032@qq.com
ENV TZ="Asia/Shanghai" HOME="/"
WORKDIR ${HOME}
COPY --from=builder /api/vendors /api/vendors
COPY config.json /api/
EXPOSE 3000
ENTRYPOINT ["node"]
#3、构建镜像
docker build -t yapi .

数据迁移

yapi的数据库是MongoDB,所以yapi的数据备份和恢复实际上就是MongoDB的数据备份与恢复,使用复制数据库文件夹,然后进行覆盖,是不可以将数据成功迁移的!
MongoDB的数据恢复一般是覆盖原有数据,如果想保留原有的数据,可以写脚本,以插入的形式添加。但若新数据与原有数据有重复,会添加错误,只能编写脚本判断

在yapi页面进行数据导出及导入

数据库数据迁移

这里主要使用两个命令:mongodump、mongorestore

数据导出
  • -h:
    MongDB所在服务器地址,例如:127.0.0.1,当然也可以指定端口号:127.0.0.1:27017
  • -d:
    需要备份的数据库实例,例如:yapi
  • -o:
    备份的数据存放位置,例如:/home/apps,当然该目录需要提前建立,在备份完成后,系统自动在dump目录下建立一个yapi目录,这个目录里面存放该数据库实例的备份数据。
1
2
3
4
5
6
7
8
9
10
# mongo 
# show dbs
local 0.000GB
yapi 0.010GB
# exit
导出:
# mongodump -h dbhost -d dbname -o dbdirectory 用法
# mongodump -d yapi -o /home/apps/
# 如果yapi搭建在容器内,希望在宿主机上执行该命令,则可以调整成:
# docker exec $容器名 mongodump -d yapi -o /my-yapi/
数据导入
  • –h:
    MongoDB所在服务器地址,默认为: localhost:27017
  • -d :
    需要恢复的数据库实例,例如:yapi,当然这个名称也可以和备份时候的不一样,比如test
  • –drop:
    恢复的时候,先删除当前数据,然后恢复备份的数据。就是说,恢复后,备份后添加修改的数据都会被删除,慎用哦!
  • backupdirectory:
    mongorestore 最后的一个参数,设置备份数据所在位置,例如:/home/apps/yapi。
  • –dir:
    指定备份的目录

如果在其他主机部署了一个新的yapi,那么最好先把现有的记录删除。最好备份恢复时让mongodb以及yapi版本保持一致,不然容易出错。同时最好加上–drop选项,保证恢复的完整性。

1
2
3
4
5
mongorestore -h dbhost -d dbname --dir backupdirectory
mongorestore -d yapi --drop --dir /home/apps/yapi
# docker
docker cp /home/jenkins/yapi 3b16a957f479:/home/apps
docker exec 3b16a957f479 mongorestore -d yapi --drop --dir /home/apps/yapi

项目合并统一文档

updateAllDoc.js

1
2
3
4
5
6
7
8
9
10
11
12
db.interface.deleteMany({"project_id":20});

db.interface.find({"project_id":{$ne:20}},{_id:0})
.sort({title:1})
.forEach((it)=>{
var oldCat= db.interface_cat.findOne({"project_id":it.project_id ,"_id":it.catid });
var newCat= db.interface_cat.findOne({"project_id":20 ,"name":oldCat.name });
it.project_id= 20;
it.catid = newCat._id;
db.interface.insert(it);
print(it.title + "done");
});
1
2
3
4
5
6
7
8
#!/bin/bash

#获取mongoDB容器ID
CONTAINER_ID=`docker ps --format "table {{.ID}}\t{{.Names}}\t{{.Ports}}\t{{.Status}}" |grep mongo-yapi|awk '{print $1}'`

#执行脚本, 将各中心的接口文档合并成一个
docker cp /home/jenkins/updateAllDoc.js $CONTAINER_ID:/
docker exec -it $CONTAINER_ID /bin/bash -c 'mongo 127.0.0.1:27017/yapi updateAllDoc.js'

问题

文档导出长参数时结构变形

解决:

./vendors/exts/yapi-plugin-export-data/defaultTheme.css

1
2
3
4
5
6
td,
th{
border:1px solid #ddd;
padding:3px 10px;
while-space:nowrap
}
阅读全文
专项测试

压力崩溃

monkey (adb命令)

遍历

Maxim

https://github.com/zhangzhao4444/Maxim

1
2
3
adb shell CLASSPATH=/data/local/tmp/monkey.jar:/data/local/tmp/framework.jar exec app_process /system/bin tv.panda.test.monkey.Monkey -p com.panda.videoliveplatform --uiautomatormix --running-minutes 6 -v -v --throttle 400 --output-directory /data/local/tmp/
# gitbash下
adb shell CLASSPATH=//data/local/tmp/monkey.jar://data/local/tmp/framework.jar exec app_process //system/bin tv.panda.test.monkey.Monkey -p com.panda.videoliveplatform --uiautomatormix --running-minutes 6 -v -v --throttle 400 --output-directory //data/local/tmp/

NoSmoke

https://github.com/macacajs/NoSmoke

性能分析工具

sdk tools下性能分析工具monitor mothod

执行android-sdk-windows\tools\monitor.bat即可运行,可以分析app运行的性能。

studio mothod工具
mothod cpu mem

堆文件hprof diff
hprof-conv xx.hprof xx.jvm.hprof

jvm内存分析工具(可分析上面的堆文件)
jvisualvm

卡顿检测

systrace工具

1
py -2 /d/software/Android/android-sdk/platform-tools/systrace

关键硬件资源的占⽤率

1
2
3
4
5
adb shell dumpsys procstats --hours 3
adb shell dumpsys meminfo package_name|pid [-d]
adb shell dumpsys batterystats --charged packagename
adb shell dumpsys netstats detail
adb shell dumpsys gfxinfo package-name

录屏截图分析

录屏

1
adb shell screenrecord --bugreport  --time-limit 30  //xx/xx.mp4

截图

1
screencap /xx/xx.png

拆帧工具ffmpeg

1
2
ffmpeg -i xxxx.mp4 -r 20 img-%03d.png
ffmpeg -i xxxx.mp -ss 00:00:08.88 -to 00:00:11.11 xx.gif

网页资源加载分析

webview
w3c performance api

example

1
2
3
4
5
6
7
8
9
10
11
12
13
14
15
16
17
18
19
20
21
22
查看activity的创建时间
package=com.xueqiu.android
清理缓存数据: adb shell pm clear $package
停止进程: adb shell am force-stop $package
启动app: adb shell an start -S -W $package/.view.WelcomeActivityAlias
获取数据:
adb logcat | grep "Displayed "

对接influxdb&Grafana可视化监控平台
pids=$(adb shell ps -ef | grep xxx | head -1 |grep -v grep | awk '{print $2}' | xargs | sed 's# #,#g')
adb shell top -d 1 -n 1 -p $pids
adb shell top -d 1 -p $pids -o %CPU,%MEM,NAME -n 1 -b | grep xxx

pids=$(adb shell ps -ef | grep xxx | grep -v grep | awk '{print $2}' | xargs | sed 's# #,#g')
for(i=0;<20:;++); do
content=$(adb shell top -d 1 p $pids -0 %CPU,%MEM,NAME n 1 -b | grep bili)
echo $content
cpu=$(echo "Sconten" | awk print $1)
mem=$(echo "Scontent" | awk {print $2})
echo curl -i -XPOST 'http://192.168.13.1:8086/write?db=testdb" --data-binary "cpu.user-$USER.app=bill value=$cpu"
echo curl -i -XPOST 'http://192.168.13.1:8086/write?db=testdb' --data-binary "mem.user-$USER.app=bill value=$mem"
done
阅读全文
Shell

字符串比较

比较运算符

比较运算符是比较值并返回true或false的运算符。 在比较Bash中的字符串时,您可以使用以下运算符:

1
2
3
4
5
6
7
8
9
10
11
12
13
14
15
# - 相等运算符,如果字符串相等,则返回true。将=运算符与test [命令一起使用。将==运算符与[[模式匹配命令]一起使用。
`string1 = string2`
`string1 == string2`
# - 不等式运算符,如果字符串不相等,则返回true
`string1 != string2`
#- 正则表达式运算符,如果左边字符串数与右侧的扩展正则表达式匹配,则返回true
`string1 =~ regex `
# - 大于运算符,按字典顺序(字母顺序)排序,如果左边字符串大于右边字符串,则返回true
`string1 > string2`
# - 小于运算符,按字典顺序(字母顺序)排序,如果右边边字符串大于左边字符串,则返回true
`string1 < string2`
# - 如果字符串长度为零,则为True。
`-z string`
# - 如果字符串长度不为零,则为True。
`-n string`

注意点:

  • 必须在二元运算符和操作数之间使用空格。
  • 始终在变量名称周围使用双引号以避免任何单词拆分或通配问题。
  • Bash不按“类型”隔离变量,变量根据上下文被视为整数或字符串。

    检查两个字符串是否相等

    在大多数情况下,在比较字符串时,您需要检查字符串是否相等。
  • test [命令检查字符串是否与=运算符相等:
    1
    2
    3
    4
    5
    6
    7
    8
    9
    10
    #!/bin/bash

    VAR1="Linux.com"
    VAR2="Linux.com"

    if [ "$VAR1" = "$VAR2" ]; then
    echo "字符串是相等的。"
    else
    echo "字符串是不相等的。"
    fi
    执行脚本时,它将打印:字符串是相等的
  • 使用[[command and == operator]
    1
    2
    3
    4
    5
    6
    7
    8
    9
    10
    #!/bin/bash

    read -p "请输入第一个字符串: " VAR1
    read -p "请输入第二个字符串: " VAR2

    if [[ "$VAR1" == "$VAR2" ]]; then
    echo "字符串是相等的。"
    else
    echo "字符串是不相等的。"
    fi
    运行脚本并在提示时输入字符串:
    请输入第一个字符串: www.linux.com
    请输入第二个字符串: linux.com
    字符串是不相等的。
  • 使用逻辑和&&和或|| 比较字符串:
    1
    [[ "string1" == "string2" ]] && echo "linux.com" || echo "linux"

    检查String是否包含子字符串

  • 星号符号*来环绕子串(匹配所有字符)
    1
    2
    3
    4
    5
    6
    #!/bin/bash

    VAR='GNU/Linux 是一个操作系统'
    if [[ $VAR == *"Linux"* ]]; then
    echo "它在那里。"
    fi
  • 正则表达式运算符=〜
    1
    2
    3
    4
    5
    6
    #!/bin/bash

    VAR='GNU/Linux 是一个操作系统'
    if [[ $VAR =~ .*Linux.* ]]; then
    echo "它在那里。"
    fi

    检查String是否为空

    可以使用-n和-z运算符来完成此操作
    1
    2
    3
    4
    5
    6
    #!/bin/bash

    VAR=''
    if [[ -z $VAR ]]; then
    echo "字符串为空。"
    fi
    输出:字符串为空
    1
    2
    3
    4
    5
    6
    #!/bin/bash

    VAR=='linux.com'
    if [[ -n $VAR ]]; then
    echo "字符串不为空。"
    fi
    输出:字符串不为空。

    使用ase操作符比较字符串

    1
    2
    3
    4
    5
    6
    7
    8
    9
    10
    11
    12
    13
    #!/bin/bash

    VAR="Arch Linux"

    case $VAR in

    "Arch Linux")
    echo -n -e "Linux 匹配\n"
    ;;
    [Fedora](https://www.linux.com/topicnews.aspx?tid=5) | [CentOS](https://www.linux.com/topicnews.aspx?tid=14))
    echo -n "[Red Hat](https://www.linux.com/topicnews.aspx?tid=10)"
    ;;
    esac
    输出:Linux 匹配

    字典比较

    词法比较是通过从左到右顺序比较字符串中的字符,按字母顺序比较两个字符串的操作。这种比较很少使用。
    下面的脚本从词汇上比较了两个字符串:
    1
    2
    3
    4
    5
    6
    7
    8
    9
    10
    11
    12
    #! /bin/bash
    value1=linux
    value2=linux.com
    if [ $value1 \> $value2 ]
    then
    echo "$value1 大于 $value2"
    elif [ $value1 \< $value2 ]
    then
    echo "$value1 小于 $value2"
    else
    echo "$value1 等于 $value2"
    fi
    该脚本将输出以下内容:linux 小于 linux.com
阅读全文
FFMPEG安装使用

Windows环境安装

FFmpeg是一套用来记录、转换数字音频、视频的计算机开源程序。提供录制、转换以及流化音视频的完整解决方案。包含音频/视频编码解码库libavodec

https://github.com/FFmpeg/FFmpeg

下载:https://ffmpeg.zeranoe.com/builds/

解压->d:/ffmpeg

添加环境变量:d:/ffmpeg/bin

查看版本:ffmpeg -version

Linux环境安装

下载:http://ffmpeg.org/releases/

1
2
3
4
5
6
7
8
9
10
11
12
13
14
15
16
17
18
tar -jxvf ffmpeg-3.4.1.tar.bz2
cd ffmpeg-3.4.1

yum install yasm

./configure --enabled-shared --prefix=/usr/local/ffmpeg
make && make install

vim /etc/ld.so.conf
/usr/local/ffmpeg/lib.

ldconfig

vim /etc/profile
export FFMPEG_HOME=/usr/local/ffmpeg
export PATH=$FFMPEG_HOME/bin:$PATH

source /etc/profile

FFmpeg的使用

视频转换格式—-将test.avi格式的软件转换为test.mp4

1
ffmpeg -i test.avi test.mp4

视频截图保存为图片

1
ffmpeg -i inputfile.avi -r 1 -q:v 2 -f image2 image-%05d.jpg

-r:指定抽取的帧 即从视频中每秒抽取图片的数量 1代表每秒抽取一帧

-f:保存图片使用的格式 可省略

Image-%05d.jpg:指定文件的输出名字

截取与合并视频

截取:

1
ffmpeg  -i 0005.mp4 -vcodec copy -acodec copy -ss 00:00:00 -to 00:00:100 d:/cutout1.mp4 -y  

-ss:指定从什么时候开始

-t:指定需要截取多长时间

-i:指定输入文件

截取视频如果出现时间点不对,出现这种情况的原因是因为截取到的地方不是关键帧,如果项目中对时间要求比较精确的话,需要先将视频将所有的帧提前转换关键帧—-将所有的帧编码方式转变为帧内编码

老版本:

1
ffmpeg -i input -samep -intra output

​ -i:输入视频文件

​ -sameq :保持同样的视频质量

​ -intra :帧内编码

​ output:输出文件名

新版本:

1
ffmpeg -i inputfile -strict -2 -qscale 0 -intra output.mp4

合成:

1
2
3
ffmpeg -ss 00:00:00 -t 00:00:20 -i input.mp4 -vcodec copy output.mp4

ffmpeg -f concat -i list.txt -c copy concat.mp4

list.txt文件中的书写方式:

file video1.mp4

file video2.mp4

给视频添加水印

1
ffmpeg -i xiaozheng.mp4 -i mark.png -filter_complex overlay test1.mp4  

给视频添加文字水印:

1
ffmpeg -i xiaozheng.mp4 -vf "drawtext=fontfile=simsunb.ttf: text='zhengqijia':x=100:y=10:fontsize=24:fontcolor=yellow:shadowy=2" drawtext.mp4

文字水印filter是drawtext simsunb.ttf:text=’zhengqijia’

x:y是显示位置

fontsize:文字大小

fontcolor:文字颜色

给视频添加图片水印:

1
ffmpeg -i input.mp4 -vf "movie=mark.png[watermark];[in][watermark] overlay=10:10[out]" output.mp4
阅读全文
STF部署及集成jenkins

STF多设备管理平台

https://github.com/openstf

部署

1
2
3
4
5
6
7
8
9
10
11
12
13
14
15
16
17
18
19
20
21
22
23
24
25
26
27
28
29
30
31
32
33
34
$IP

#拉取openstf镜像
docker pull openstf/stf:latest

#拉取adb镜像
docker pull sorccu/adb:latest

#拉取ambassador镜像
docker pull openstf/ambassador:latest

#拉取rethinkdb数据库镜像

docker pull rethinkdb:latest

#拉取nginx镜像
docker pull nginx:latest

#启动数据库
docker run -d --name rethinkdb -v ~/docker/STF/rethinkdb:/data --net host rethinkdb rethinkdb --bind all --cache-size 8192 --http-port 8090

#启动adb service
docker run -d --name adbd --privileged -v /dev/bus/usb:/dev/bus/usb/ --net host sorccu/adb:latest

#启动stf服务
docker run -d --name stf --net host openstf/stf stf local --public-ip $IP

#nodaemon模式启动远端机器adb server并对外暴露5037端口
adb nodaemon server -a -P 5037

#通过配置 adb host 的方式连上远端机器的设备
stf provider --name centos7 --min-port 7400 --max-port 7700 --connect-sub tcp://127.0.0.1:7114 --connect-push tcp://127.0.0.1:7116 --group-timeout 900 --public-ip 192.168.13.128 --storage-url http://localhost:7100/ --adb-host 192.168.13.1 --adb-port 5037 --vnc-initial-size 600x800 --mute-master never --allow-remote
#如要连装stf服务的机器的设备,不需要增加--adb-host
stf provider --name centos --min-port 7400 --max-port 7700 --connect-sub tcp://127.0.0.1:7114 --connect-push tcp://127.0.0.1:7116 --group-timeout 20000 --public-ip 192.168.13.128 --storage-url http://localhost:7100/ --vnc-initial-size 600x800 --allow-remote

stf服务搭建脚本

https://github.com/guobq/mysource/blob/master/dockerbuildSTF.sh

操作可参考:

https://testerhome.com/topics/7966?locale=en

https://blog.csdn.net/FloatDreamed/article/details/103809814?utm_medium=distribute.pc_relevant_t0.none-task-blog-BlogCommendFromMachineLearnPai2-1.channel_param&depth_1-utm_source=distribute.pc_relevant_t0.none-task-blog-BlogCommendFromMachineLearnPai2-1.channel_param

非交互式调用

https://github.com/openstf/stf/blob/master/doc/API.md

1
2
3
4
5
6
7
8
9
curl -H "Authorization: Bearer YOUR-TOKEN-HERE" https://stf.example.org/api/v1/user
# 获得设备列表:
curl -H "Authorization: Bearer $key" http://localhost:7100/api/v1/devices | jq .devices[].serial
# 申请设备
curl -X POST --header "Content-Type: application/json" --data '{"serial":"$device"}' -H "Authorization: Bearer $key" http://127.0.0.1:7100/api/v1/user/devices
# 远程调试
curl -X POST -H "Authorization: Bearer $key" http://127.0.0.1:7100/api/v1/user/devices/$device/remoteConnect
# 释放设备
curl -X DELETE -H "Authorization: Bearer $key" http://127.0.0.1:7100/api/v1/user/devices/$device

adb 架构

shell实现方式(依赖 jq)

jq:https://stedolan.github.io/jq/

1
2
3
4
5
6
7
8
9
10
11
12
13
14
15
16
17
18
19
20
21
22
23
24
25
26
27
28
29
30
31
32
33
34
35
36
37
38
39
40
41
42
43
44
45
46
47
48
49
50
51
52
53
54
55
56
57
58
59
60
61
62
63
64
65
66
67
68
69
70
71
72
73
74
#!/usr/bin/env bash

set -euxo pipefail
STF_URL=http://192.168.13.128:7100/
STF_TOKEN=

if [ "$DEVICE_SERIAL" == "" ]; then
echo "Please specify device serial using ENV['DEVICE_SERIAL']"
exit 1
fi

if [ "$STF_URL" == "" ]; then
echo "Please specify stf url using ENV['STF_URL']"
exit 1
fi

if [ "$STF_TOKEN" == "" ]; then
echo "Please specify stf token using using ENV['STF_TOKEN']"
exit 1
fi

function add_device
{
response=$(curl -X POST -H "Content-Type: application/json" \
-H "Authorization: Bearer $STF_TOKEN" \
--data "{\"serial\": \"$DEVICE_SERIAL\"}" $STF_URL/api/v1/user/devices)

success=$(echo "$response" | jq .success | tr -d '"')
description=$(echo "$response" | jq .description | tr -d '"')

if [ "$success" != "true" ]; then
echo "Failed because $description"
exit 1
fi

echo "Device $DEVICE_SERIAL added successfully"
}

function remote_connect
{
response=$(curl -X POST \
-H "Authorization: Bearer $STF_TOKEN" \
$STF_URL/api/v1/user/devices/$DEVICE_SERIAL/remoteConnect)

success=$(echo "$response" | jq .success | tr -d '"')
description=$(echo "$response" | jq .description | tr -d '"')

if [ "$success" != "true" ]; then
echo "Failed because $description"
exit 1
fi
remote_connect_url=$(echo "$response" | jq .remoteConnectUrl | tr -d '"')

adb connect $remote_connect_url

echo "Device $DEVICE_SERIAL remote connected successfully"
}

function remove_device
{
response=$(curl -X DELETE \
-H "Authorization: Bearer $STF_TOKEN" \
$STF_URL/api/v1/user/devices/$DEVICE_SERIAL)

success=$(echo "$response" | jq .success | tr -d '"')
description=$(echo "$response" | jq .description | tr -d '"')

if [ "$success" != "true" ]; then
echo "Failed because $description"
exit 1
fi

echo "Device $DEVICE_SERIAL removed successfully"
}

jenkins集成业务逻辑

1
2
3
4
5
6
7
8
9
10
11
12
13
14
15
16
17
18
19
20
21
# 获取设备uuid,厂家,os版本,屏幕尺寸
adb devices | grep device | grep -v List |awk '{print $1}' | while read line;do brand=$(adb -s $line shell getprop ro.product.manufacturer);osversion=$(adb -s $line shell getprop ro.build.version.release);size=$(adb -s $line shell wm size);echo $line $brand $osversion $size;done
# jenkins执行远程shell
echo brand=$brand os=$os size=$size
grep -1 "$brand.*$os." / tmp/devices
device=$(grep -i "$brand.*$os.*" /tmp/devices| awk '{print $1}')
adb -s $device shell wm size
# emulator-5554 Google 10 Physical size: 1440x2560
DEVICE_SERIAL=$device
# 上面shell实现方式,可以以sh脚本方式调用:.stf.sh
# 业务逻辑
add_device
remote_connect
sleep 2
adb_devices
# 执行脚本
echo run monkey or appcrawler
adb -s $remote_connect_url shell monkey --throttle -p com.android.calculator2 200
remove_device
adb devices
adb disconnect
阅读全文
pytest使用allure报告

github地址

https://github.com/allure-framework/allure2

特性

feature/story

• Feature 相当于一个功能,一个大的模块;
• Story相当于对应这个功能或者模块下的不同场景,分⽀功能;
• Feature和story类似父子关系

severity

• Blocker级别:中断缺陷(客户端程序无响应,无法执行下一步操作)
• Critical级别:临界缺陷( 功能点缺失)
• Normal级别:普通缺陷(数值计算错误)
• Minor级别:次要缺陷(界⾯错误与UI需求不符)
• Trivial级别:轻微缺陷(必输项无提示,或者提示不规范)

step

• 测试过程中每个关键步骤;
• 在app, web自动化测试当中,建议每切换到一个新的页面,当做一个step

issue,testcase

• 关联测试用例;
• 关联bug

parameters

• 一次运行多个测试用例

1
2
3
4
5
6
7
# 按features运行测试用例
pytest --alluredir=log/report/xml --allure-features=测试登录功能,测试我的自选 testcases/alluredemo
# 按story运行测试用例
pytest --alluredir=log/report/xml --allure-stories=测试已登录的场景 testcases/alluredemo
pytest --alluredir=result/report --allure-stories=设备入库 page_object/testcase/test_res.py
# 按severity运行测试用例
pytest --alluredir=log/testreport/xml --allure-severities=blocker testcases/alluredemo

@allure.attach显⽰许多不同类型的提供的附件,可以补充测试,步骤或测试结果。

1
2
3
4
5
6
7
8
9
10
11
12
13
14
# 安装插件(需要先安装allure)
pip install allure-pytest
# 在测试执⾏期间收集结果
pytest -s –q --alluredir=./result/
# 测试完成后查看实际报告,在线看报告。
allure serve ./result/
# 从结果⽣成报告,这是⼀个启动tomcat的服务,只⽣成报告,覆盖路径加--clean
allure generate ./result/ -o ./report/ --clean#result就是结果目录,report生成最终的html报告目录
# 打开报告
allure open -h 127.0.0.1 -p 8883 ./report/
# example
pytest --alluredir=report/allure/result --allure-stories=设备入库,业务新装,加装 testcase/test_new_outfit.py
allure generate ./report/allure/result -o ./report/allure/html --clean
allure open -h 127.0.0.1 -p 8883 ./report/allure/html
阅读全文
Algolia