httprunner 相关:python,pytest,allure,locust,requests,git
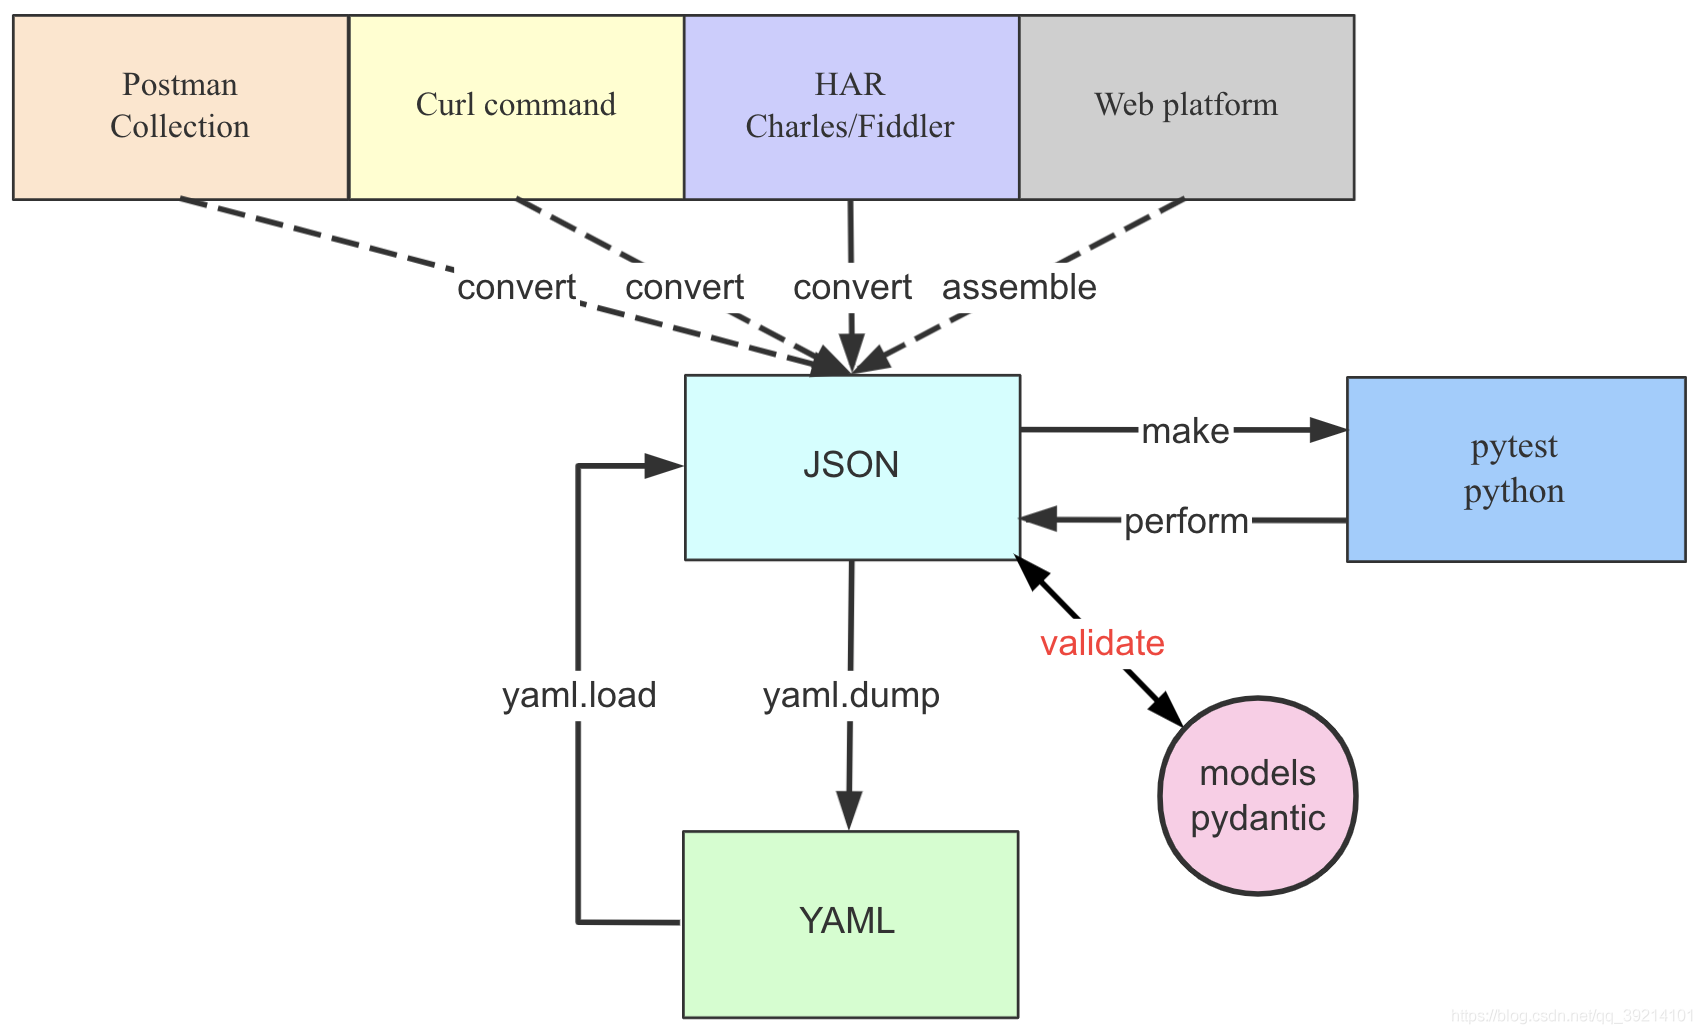
ENV prepare 1 2 3 4 5 6 7 8 pip install httprunner -i https://pypi.douban.com/simple hrun -V #查看版本 httprunner --help #查看帮助 # positional arguments:{run,startproject,har2case,make} # run Make HttpRunner testcases and run with pytest.运行httprunner文件 # startproject Create a new project with template structure.创建httprunner项目结构 # har2case Convert HAR(HTTP Archive) to YAML/JSON testcases for HttpRunner.转换har文件为yml文件或者json文件或者pytest文件 # make Convert YAML/JSON testcases to pytest cases. 转换yml或json文件为pytest文件
create project 1 2 # cmd到项目文件下执行: httprunner startproject interfacedemo#interfacedemo为接口项目名称
各个目录代表的含义: 1 2 3 4 5 6 - debugtalk.py 放置在项目根目录下(类似pytest的conftest文件) - .env 放置在项目根目录下,可以用于存放一些环境变量 - reports 文件夹:存储 HTML 测试报告 - testcases 用于存放测试用例 - har 可以存放录制导出的.har文件 - .gitignore 设置上传到git时需要忽略那些文件信息
执行方式 1 2 3 4 5 6 1、hrun interfaceDemo # 命令等价于httprunner run interfaceDemo,其中先进行httprunner make json/yml,会将json/yml文件先转换为pytest文件,之后再执行hrun(httprunner run),如果pytest文件是已经存在的(你直接编写的pytest文件,而不是yml或者json),httprunner会直接运行你的pytest脚本,不需要进行转换,官方推荐:直接使用pytest脚本编写 # 在tacecases目录下生成py文件,生成的py文件会加上_test后缀,如果yml或者json文件有修改,需要再次http make scriptPath一下,或者直接修改py文件 # 生成了logs日志文件,每一个yml都会对应生成一个日志文件如下,每一个testcase脚本都会又要给唯一的id,对应了日志文件的文件名: 2、pytest interfaceDemo # 前提,已经使用hrun interfaceDemo生成了yml或json对应的pytest文件,否则不生效
har文件录制及转换
工具:Fiddler,Charles,Chrome等
1 2 3 4 5 har2case har_demo.har -2j#生成json文件命令 har2case har_demo.har -2y#生成yml文件命令 har2case har_demo.json/har_demo.yml#转换为py文件 # 可以使用:hrun har_demo_test.py/har_demo.json/har_demo.yml运行脚本 # 使用pytest har_demo_test.py只能运行py文件,不能运行yml或者json
测试用例结构 每个测试用例都是的子类HttpRunner,并且必须具有两个类属性:config和teststeps。
chain call 就是IDEA的api代码自动补全
config 每个测试用例都应该有一个config部分,您可以在其中配置测试用例级别的设置。
name(必填) 指定测试用例名称。这将显示在执行日志和测试报告中
base_url(可选) 指定SUT的通用架构和主机部分,例如https://postman-echo.com。如果base_url指定,则teststep中的url只能设置相对路径部分。如果要在不同的SUT环境之间切换,这将特别有用。
variables(可选) 指定测试用例的公共变量。每个测试步骤都可以引用未在步骤变量中设置的配置变量。换句话说,步骤变量比配置变量具有更高的优先级。
verify (可选) 指定是否验证服务器的TLS证书。如果我们想记录测试用例执行的HTTP流量,这将特别有用,因为如果没有设置verify或将其设置为True,则会发生SSLError。
export (可选) 指定导出的测试用例会话变量。将每个测试用例视为一个黑盒,config variables是输入部分,而config export是输出部分。特别是,当一个测试用例在另一个测试用例的步骤中被引用,并且将被提取一些会话变量以在后续测试步骤中使用时,则提取的会话变量应在配置export部分中进行配置。将测试用例的某些变量指定为全局变量。(PS:不配置export在另一个引用类中进行该类的变量调用时,直接export也是可以的,最好还是配置一下)
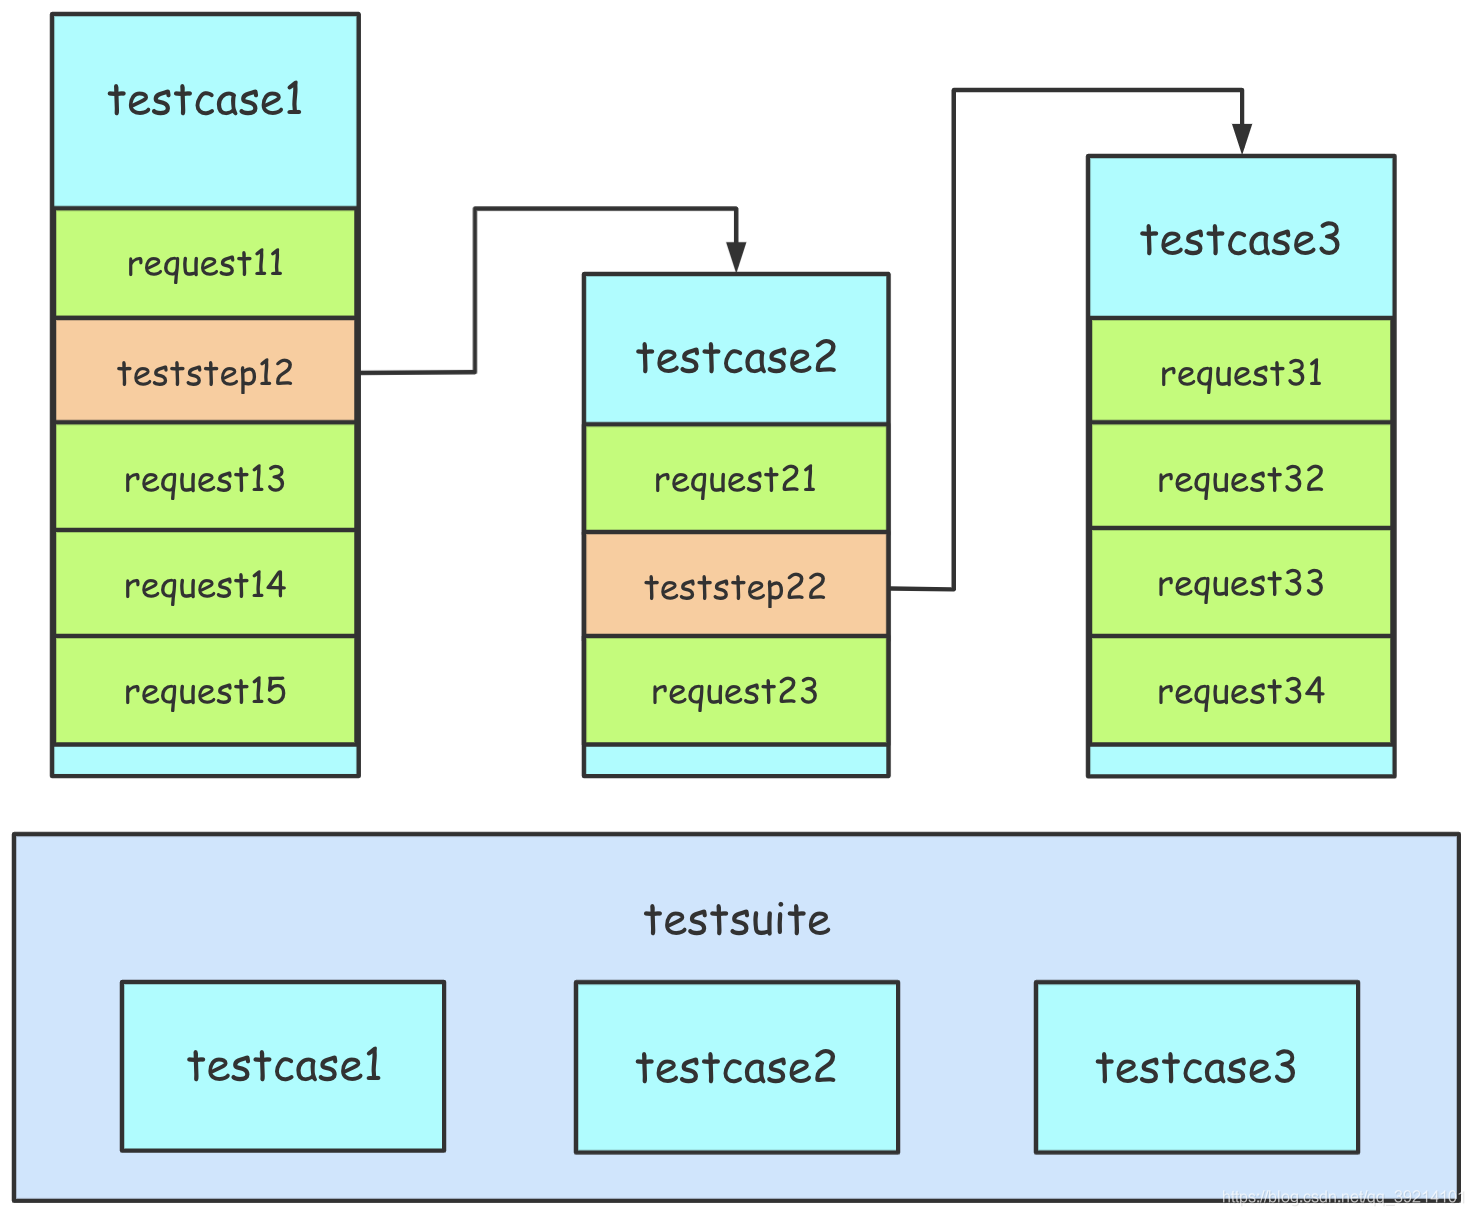
一个测试套件testsuite,套件中会有很多的测试用例testcase,testcase之间可以相互引用teststep,通过with_jmespath进行参数的提取,通过call引用其他测试用例类,然后通过export引用其他测试用例的变量。teststeps中会有很多step,也就是常说的测试步骤,一个step中只有RunRequest或者RunTestCase,step的先后顺序,有step的前后控制,由step所处的位置由上到下执行
RunRequest(名称) RunRequest 在一个步骤中用于向API发出请求,并对响应进行一些提取或验证。
method(url) 指定HTTP方法和SUT的URL。这些对应于method和url参数requests.request。
.WITH_JMESPATH
RunTestCase(名称) RunTestCase 在一个步骤中用于引用另一个测试用例调用。
.env文件 1 2 1、httprunner脚手架会默认创建创建.env文件,将需要设置为环境变量或全局变量的值,存储在env中 2、使用${ENV(变量名)}调用环境变量
针对环境变量为列表信息的可以先设置为字符串,再进行字符串转列表操作
例如服务器连接(ip|port|user|pwd):192.168.xxx.xxx|22|admin|admin
代码实现时,将字符串按“|”来进行切割,将结果保存在列表中。
1 2 3 4 5 6 7 8 9 10 11 12 13 def load_file_to_service (serviceInfo, local_path, remote_path ): """ :param serviceInfo: 服务器信息格式:ip|port|user|pwd :param local_path: 本地路径 :param remote_path: 远程路径 :return: """ info = serviceInfo.split("|" ) t = paramiko.Transport(info[0 ], int(info[1 ])) t.connect(username=info[2 ], password=info[3 ]) sftp = paramiko.SFTPClient.from_transport(t) sftp.put(local_path, remote_path) sftp.close()
debugtalk.py debugtalk.py和pytest的conftest.py文件区别:
1 conftest.py文件中的定义对当前同级目录下及同级目录下的子目录下的脚本生效,而debugtalk.py按照脚手架的默认生成,只对同级目录testcases目录下的脚本生效,如果需要在testcase下面进行脚本的细分,创建新的模块目录,然后在里面添加测试脚本,是不生效的。
debugtalk主要进行一些公共函数方法的编写例如常用的获取token、获取cookie,或者数据清理,环境初始化等操作,都可以放在debugtalk中。
将脚本中的方法引用到其他处,格式”${方法名}”,即能实现参数化
setup和teardown及hook httprunner的setup和teardown可以在yml或者json文件中定义(建议py文件中)
httprunner有两种setup和teardown的定义方式,一个是测试类级别,一个是测试步骤级别的定义。
测试类级别的setup和teardown 1 2 3 4 5 6 7 8 9 10 11 12 13 14 15 16 17 18 19 20 21 22 23 24 25 26 27 28 29 30 31 32 33 34 35 36 37 38 39 40 41 42 43 44 45 46 47 48 49 50 51 52 53 54 55 56 57 58 59 60 61 62 63 64 65 66 67 68 69 from httprunner import HttpRunner, Config, Step, RunRequest, RunTestCase class TestBaiduRequestTestCase (HttpRunner ): def setup (self ): print("运行于测试用例之前" ) def teardown (self ): print("运行于测试用例之后" ) config = ( Config("get user list" ) .base_url("https://www.baidu.com" ) .verify(False ) ) teststeps = [ Step( RunRequest("get info" ) .get("/" ) .validate() .assert_equal("status_code" , 200 ) ) ] if __name__ == "__main__" : TestBaiduRequestTestCase().test_start() from httprunner import HttpRunner, Config, Step, RunRequest, RunTestCase class TestBaiduRequestTestCase (HttpRunner ): @classmethod def setup_class (cls ): print("运行于测试用例之前" ) @classmethod def teardown_class (cls ): print("运行于测试用例之后" ) config = ( Config("get user list" ) .base_url("https://www.baidu.com" ) .verify(False ) ) teststeps = [ Step( RunRequest("get info" ) .get("/" ) .validate() .assert_equal("status_code" , 200 ) ) ] if __name__ == "__main__" : TestBaiduRequestTestCase().test_start()
测试步骤前后的setup和teardown 在debugtalk.py中写hook_up和hook_teardown
1 2 3 4 5 6 7 8 9 def hook_up (): print("前置操作:setup!" ) def hook_down (response=None ): print("后置操作:teardown!" ) if response: print(response) response.status_code = 300
在demo_baidu_request_test.py中调用debugtalk的两个hook方法,使用setup_hook()和teardown_hook()来加载我们自定义的hook:
1 2 3 4 5 6 7 8 9 10 11 12 13 14 15 16 17 18 19 20 21 22 23 24 25 26 27 28 29 30 31 32 33 34 35 36 37 38 39 40 from httprunner import HttpRunner, Config, Step, RunRequest, RunTestCase class TestBaiduRequestTestCase (HttpRunner ): @classmethod def setup_class (cls ): print("运行于测试用例之前" ) @classmethod def teardown_class (cls ): print("运行于测试用例之后" ) config = ( Config("get user list" ) .base_url("https://www.baidu.com" ) .verify(False ) ) teststeps = [ Step( RunRequest("get info" ) .setup_hook("${hook_up()}" ) .get("/" ) .teardown_hook("${hook_down()}" ) .validate() .assert_equal("status_code" , 200 ) ) ] if __name__ == "__main__" : TestBaiduRequestTestCase().test_start()
既然是hook方法,那么肯定是会集成一些内置的钩子,满足特殊的要求所使用的。
1 2 3 4 5 6 7 8 def hook_up (request=None ): print("输出request:{}" .format(request)) print("前置操作:setup!" ) def hook_down (response=None ): print("输出response:{}" .format('\n' .join(['%s:%s' % item for item in response.__dict__.items()]))) print("后置操作:teardown!" )
在demo_baidu_request_test.py文件中调用这两个hook,然后传递参数$request和$response。
1 2 3 4 5 6 7 8 9 10 11 12 13 14 15 16 17 18 19 20 21 22 23 24 25 26 27 28 29 30 31 32 33 34 35 36 37 38 39 40 from httprunner import HttpRunner, Config, Step, RunRequest, RunTestCase class TestBaiduRequestTestCase (HttpRunner ): @classmethod def setup_class (cls ): print("运行于测试用例之前" ) @classmethod def teardown_class (cls ): print("运行于测试用例之后" ) config = ( Config("get user list" ) .base_url("https://www.baidu.com" ) .verify(False ) ) teststeps = [ Step( RunRequest("get info" ) .setup_hook("${hook_up($request)}" ) .get("/" ) .teardown_hook("${hook_down($response)}" ) .validate() .assert_equal("status_code" , 200 ) ) ] if __name__ == "__main__" : TestBaiduRequestTestCase().test_start()
传入的是一个request和response对象,可以对传入的request和response对象进行操作,修改resquest和response传入和返回的值,完成复杂的业务要求。
1 2 3 4 5 6 7 8 9 10 11 12 def hook_up (request=None ): print("输出request:{}" .format(request)) print("前置操作:setup!" ) if request: request["params" ]["username" ] = "888888" def hook_down (response=None ): print("输出response:{}" .format('\n' .join(['%s:%s' % item for item in response.__dict__.items()]))) print("后置操作:teardown!" ) if response: response.status_code = 404
修改了传入的setp的密码为“888888”,修改了step返回的状态码为404,看一下调用情况:
1 2 3 4 5 6 7 8 9 10 11 12 13 14 15 16 17 18 19 20 21 22 23 24 25 26 27 28 29 30 31 32 33 34 35 36 37 38 39 40 41 42 43 44 45 46 47 48 49 50 51 52 53 54 from httprunner import HttpRunner, Config, Step, RunRequest, RunTestCase class TestBaiduRequestTestCase (HttpRunner ): @classmethod def setup_class (cls ): print("运行于测试用例之前" ) @classmethod def teardown_class (cls ): print("运行于测试用例之后" ) config = ( Config("get user list" ) .variables( **{ "username" : "123456" } ) .base_url("https://www.baidu.com" ) .verify(False ) ) teststeps = [ Step( RunRequest("get info" ) .setup_hook("${hook_up($request)}" ) .get("/" ) .with_params(**{"username" : "${username}" }) .teardown_hook("${hook_down($response)}" ) .validate() .assert_equal("status_code" , 200 ) ) ] if __name__ == "__main__" : TestBaiduRequestTestCase().test_start()
参数化数据驱动 1 2 3 4 5 支持三种入参,返回一个列表: 1、列表:["iOS/10.1", "iOS/10.2", "iOS/10.3"] 2、Parameterize类的回调,例如csv:${parameterize(account.csv)} 3、debugtalk.py的回调,${gen_app_version()} 在使用参数化之前,首先要导入pytest包,和httprunner的Parameters这个类
1 2 3 4 5 6 7 8 9 10 11 12 13 14 15 16 17 18 19 20 21 22 23 24 25 26 27 28 29 30 31 32 33 34 35 36 37 import pytest from httprunner import Parameters from httprunner import HttpRunner, Config, Step, RunRequest, RunTestCase class TestBaiduRequestTestCase (HttpRunner ): @pytest.mark.parametrize("param", Parameters( {"username" : [111 , 222 , 333 ]} )) def test_start (self, param ): super().test_start(param) config = ( Config("get user list" ) .variables( **{ "username" : "${get_username()}" } ) .base_url("https://www.baidu.com" ) .verify(False ) ) teststeps = [ Step( RunRequest("get info" ) .get("/" ) .with_params(**{"username" : "$username" }) .validate() .assert_equal("status_code" , 200 ) ) ] if __name__ == "__main__" : TestBaiduRequestTestCase().test_start()
pytest.mark.parametrize()会先将param作为一个动态参数,传递给param,然后由httprunner在进行参数化,httprunner在pytest的parametrize上封装了一层,增加了csv及debugtalk.py参数化的支持。
列表 1 2 3 4 5 6 7 8 9 10 11 12 13 14 15 16 17 18 19 20 21 22 23 24 25 26 27 28 29 30 31 32 33 34 35 36 37 import pytest from httprunner import Parameters from httprunner import HttpRunner, Config, Step, RunRequest, RunTestCase class TestBaiduRequestTestCase (HttpRunner ): @pytest.mark.parametrize("param", Parameters( {"username" : [111 , 222 , 333 ]} )) def test_start (self, param ): super().test_start(param) config = ( Config("get user list" ) .variables( **{ "username" : "${get_username()}" } ) .base_url("https://www.baidu.com" ) .verify(False ) ) teststeps = [ Step( RunRequest("get info" ) .get("/" ) .with_params(**{"username" : "$username" }) .validate() .assert_equal("status_code" , 200 ) ) ] if __name__ == "__main__" : TestBaiduRequestTestCase().test_start()
debugtalk.py的回调函数 在debugtalk.py中定义一个函数,返回列表:
1 2 3 4 5 6 7 8 9 def get_username (): return [ {"username" : "111111" }, {"username" : "222222" }, {"username" : "333333" }, {"username" : "444444" }, {"username" : "555555" }, {"username" : "666666" }, ]
在xx_test.py文件调用:
1 2 3 4 5 6 7 8 9 10 11 12 13 14 15 16 17 18 19 20 21 22 23 24 25 26 27 28 29 30 31 import pytest from httprunner import Parameters from httprunner import HttpRunner, Config, Step, RunRequest, RunTestCase class TestBaiduRequestTestCase (HttpRunner ): @pytest.mark.parametrize("param", Parameters( {"username" : "${get_username()}" } )) def test_start (self, param ): super().test_start(param) config = ( Config("get user list" ) .base_url("https://www.baidu.com" ) .verify(False ) ) teststeps = [ Step( RunRequest("get info" ) .get("/" ) .with_params(**{"username" : "$username" }) .validate() .assert_equal("status_code" , 200 ) ) ] if __name__ == "__main__" : TestBaiduRequestTestCase().test_start()
使用csv文件 1.csv文件中的title要为变量名
1 2 3 name,pwd name1,123 name2,123
2.csv映射的时候,参数名要以“-”分割,name和pwd使用的-进行分割
3.csv的路径要使用相对路径,不支持绝对路径不支持\符号的路径
1 2 3 @pytest.mark.parametrize("param", Parameters( {"name-pwd" : "${parametrize(testdata/namepwd.csv)}" } ))
测试报告 pytest-html 1 2 pip install pytest-html#安装pytest-html插件 hrun testcasesPath --html=path/report.html
allure 1 2 3 4 5 6 # 生成测试结果 hrun testcasePath --alluredir=resultPath#测试结果存放路径 # 第一种方式,会生成静态资源文件,通过静态资源index.html地址访问 allure generate resultPath -o reportPath # 第二种方式,不会生成静态资源文件,启动一个web服务,提供ip和port在线访问 allure serve resultPath
调试、XML消息支持、XML格式断言 添加调试信息 在调试代码时,引入loguru打印日志(httprunner源码中作者使用loguru.logger进行日志打印)
可在debugtalk.py中沿用此模块来进行日志打印
1 from loguru import logger
使用print未必会打印,但是使用logger.info会将信息打印到命令行中,格式为: logger.info()
XML消息支持 将报文内容写在文档中,用例中调用
1 2 3 4 5 6 7 8 9 10 11 12 最后将变量m_encoder付给data关键字 def get_file_std (filename ): curPath = os.path.dirname(os.path.realpath(__file__)) print('curPath' , curPath) fileurl = os.path.join(curPath, "messages/%s" % filename) print('fileurl' , fileurl) with open(fileurl, "r+" , encoding='utf8' ) as f: return f.read()
xml报文断言实现 方案一:将xml报文内容作为整体进行断言操作 ( 定义变量:xmlinfo 0
1 2 3 4 5 6 7 8 9 10 11 config: name: "batch user order sync interface" base_url: ${ENV(49_HOST)} verify: False variables: localpath: "D:\\work\\wy_only\\CtIntfDemo\\data\\update.txt" remotepath: "/iot/Filesync/User_20201027150556_7169060048412345.txt" 49serv: ${ENV(49_SERV)} oracle1: ${ENV(oracle11)} xmlinfo: '<BatchNotifyRsp><ResultCode>0</ResultCode><ResultDec></ResultDec></BatchNotifyRsp>' 12345678910
断言:
1 2 3 4 5 6 7 8 9 10 11 12 13 14 15 variables: file_path: "data\\batchOrderSync.xml" m_encoder: ${get_file_std($file_path)} retbody: ${str_bytes($xmlinfo)} request: method: POST url: /Sync/BatchOperatorNotify/User headers: Content-Type: application/xml data: $m_encoder validate: - eq: ["status_code" , 200 ] - eq: [body , $retbody ] 1234567891011121314
方法:
1 2 3 4 5 6 def str_bytes (str ): """ :param str:字符串 :return:bytes类型 """ return bytes(str, encoding="utf8" )
方案二:将xml报文内容转为json格式,再将返回结果赋值为转化后的json,最后进行json格式断言。 teardown_hooks机制,会在断言之前执行
1 2 teardown_hooks: - ${teardown_hook_xml_json($response)}
断言:
1 2 3 4 validate: - eq: ["status_code" , 200 ] - eq: [body.BatchNotifyRsp.ResultCode , "0" ]
方法:
1 2 3 4 5 6 7 8 9 10 11 12 13 14 15 16 def xml_to_json (xml_str ): xml_parse = xmltodict.parse(xml_str) json_str = json.dumps(xml_parse, indent=1 ) return json_str def teardown_hook_xml_json (response ): """ 将xml报文内容转化为json格式内容,并将返回内容替换成json格式 :param response: 返回报文对象 """ jsoninfo = xml_to_json(response.body) response.body = json.loads(jsoninfo)
questions 1.查看log时,或者报错信息是中文时,显示unicode编码。
1
2
3
4
5
6
def log_print (req_or_resp, r_type ):msg = f"\n================== {r_type} details ==================\n" for key, value in req_or_resp.dict().items():if isinstance(value, dict):value = json.dumps(value, indent=4 , ensure_ascii=False )
2.cookies管理
httprunner继承requests,可自动管理
403 Forbidden,一般是网站处于安全考虑,缺少cookies导致(有些接口需要用到cookies,cookie没关联起来)
隐藏参数csrfmiddlewaretoken
csrfmiddlewaretoken参数是html页面上的隐藏参数,是为了防止跨域伪造请求。每次刷新页面都会自动变,需要先把此参数提取出来,动态关联到请求参数的body里面

